Garage Corner Workbench Designs & Storage Organization Tips

Key Takeaways
- Discover how to optimize your garage corner with a workbench that saves space and increases efficiency.
- Learn about versatile workbench designs that can be tailored to your specific needs and space.
- Explore smart storage solutions that utilize vertical space and offer modular flexibility.
- Get tips on building custom workbenches, such as fold-down and L-shaped options, with durable surfaces.
- Find out how to enhance your workbench with organizational accessories, improved lighting, and essential safety measures.
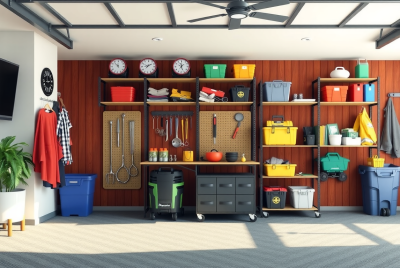
Maximize Your Space: Ingenious Garage Corner Workbench Ideas
Why Optimize Your Garage Corner
Think about it—your garage corner is often underused, filled with random items that don’t really belong anywhere. But with a little ingenuity, that corner can become the most functional spot in your garage. Why? Because it offers a unique opportunity to create a dedicated workspace that’s out of the way of foot traffic and car parking, yet accessible enough for quick fixes or extended projects.
Versatile Workbench Designs for Your Space
Every DIY enthusiast knows that the right workbench can make all the difference. It’s not just about having a flat surface to work on, it’s about having a space that adapts to your workflow and the types of projects you tackle. Whether you’re a carpenter, a mechanic, or a weekend warrior, there’s a workbench design out there that’s perfect for you.
Optimal Layouts for Efficiency
Corner Workbench Configurations
When we talk about corner workbenches, we’re looking at maximizing every square inch. A wrap-around workbench that hugs the walls can double your workspace without encroaching on the central floor area. This layout is perfect for keeping your tools within arm’s reach and offers ample bench top space for large or multiple projects.
Here’s a simple guideline for setting up your corner workbench:
- Measure the dimensions of your corner space to determine the maximum workbench size.
- Consider an L-shaped design that can offer extensive counter space while fitting snugly into the corner.
- Ensure that you have enough legroom beneath the workbench for comfortable seating and movement.

Integrating Power Tools into Your Workbench
Power tools are the lifeblood of any serious DIY project, but they can also be bulky and take up precious space. The solution? Build them into your workbench design. Create custom inserts for your most frequently used tools, such as a table saw or a drill press. This not only saves space but also allows for a more efficient workflow, as everything is exactly where you need it.
Remember:
- Always prioritize safety—make sure tools are securely mounted and that there’s no risk of them moving while in use.
- Plan for electrical outlets to be within reach, so you don’t have to deal with tangled extension cords.
- Consider adding a retractable power strip that can be hidden away when not in use to keep the surface clutter-free.
Smart Storage Solutions
Creative Use of Vertical Space
Look up! That’s right, the walls in your garage are prime real estate for storage. By installing shelves above your workbench, you’re taking advantage of vertical space that’s often overlooked. Adjustable shelving is key here, it allows you to customize the storage for different sized tools and materials. And don’t forget about the space overhead—a sturdy ceiling rack can hold seasonal items or lumber, freeing up more room around your workbench.
Modular Storage for Flexibility
Modularity is the name of the game when it comes to a well-organized garage workbench. Using stackable bins, portable toolboxes, and movable drawer units, you can rearrange your storage setup as your needs change. This kind of flexibility means you can adapt to new projects without a hitch, keeping your workspace as dynamic as your imagination.
Custom Workbench Builds
Constructing a Fold-Down Workbench
If your garage doubles as a parking space for your car, a fold-down workbench could be a game-changer. It tucks away against the wall when not in use, leaving plenty of room for your vehicle. Building one is straightforward: mount sturdy hinges to a solid wood or plywood surface, attach it to the wall, and voila! You have a workbench that appears when you need it and disappears when you don’t.
Building an L-Shaped Workbench
An L-shaped workbench is perfect for those corners begging to be used. This design allows you to work from multiple angles and can accommodate more than one person at a time—ideal for collaborative projects. Plus, it gives you the option to dedicate one side to certain tasks and the other to something completely different, like assembly and finishing.
Durable Surface Choices
Your workbench surface needs to withstand a lot of abuse. Hardwoods like maple are traditional choices for their durability and resistance to wear. Alternatively, a thick plywood top can provide a sturdy, cost-effective option. For those heavy-duty tasks, consider a metal top like steel—it’s tough, easy to clean, and can handle hot tools without damage.
Organizational Accessories
Tool Racks and Holders
There’s nothing more frustrating than searching for a tool when you’re in the middle of a project. That’s why tool racks and holders are essential. They keep your hammers, wrenches, and screwdrivers visible and within reach. Whether you go for magnetic strips, pegboards, or custom holders, the key is to have a designated spot for each tool.
Cable Management Systems
Loose cables are not only a tripping hazard, but they can also make your workspace look cluttered. A cable management system, like hooks, clips, or ties, can help keep power cords and air hoses off the floor and neatly organized. As a bonus, it prolongs the life of your cables by preventing kinks and tangles.
Lighting for Functionality
Good lighting is crucial in any workspace. Install bright, direct lights above your workbench to ensure you can see every detail of your project. LED strip lights are a popular choice—they’re energy-efficient, have a long lifespan, and provide a clean, bright light. Position them under shelves or cabinets to eliminate shadows and make working on intricate tasks easier.
- Use walls and ceilings to create additional storage space.
- Opt for adjustable and modular storage solutions for flexibility.
- Consider a fold-down workbench to save space in multi-use garages.
- Choose durable materials for your workbench surface to handle various projects.
- Install organizational accessories like tool racks and cable management systems to keep your space tidy and efficient.
- Ensure your workbench is well-lit with task lighting to improve visibility and accuracy.

Avoiding Common Hazards
In the spirit of ‘safety first’, always be mindful of the common hazards that come with a workshop environment. Sharp tools, heavy materials, and electrical equipment can pose risks if not handled or stored properly. To avoid accidents, keep your work area clean and organized, and make sure all tools are in good condition and used in accordance with their instructions. For inspiration on organizing your space, you might want to explore these DIY Corner Workbench and Storage ideas for your garage.
Smart Placement of Fire Extinguishers and First-Aid Kits
It’s crucial to have a fire extinguisher and a well-stocked first-aid kit within easy reach in your garage workshop. Place them near the entrance for quick access in an emergency. Also, familiarize yourself with their use and ensure that everyone who uses the workspace knows where they are located and how to use them. Regularly check expiration dates and replenish supplies as needed.
FAQs
Here are some frequently asked questions that can help you as you build and organize your garage workbench:
What is the Ideal Height for a Garage Workbench?
The ideal height for a garage workbench typically ranges between 34 to 38 inches, depending on your height and the type of work you’ll be doing. If you’ll be standing most of the time, make sure the workbench is at a comfortable height to avoid straining your back. If you’ll be sitting, consider allowing space for your legs under the workbench and pairing it with a chair that matches the height.
Can I Build a Workbench With Limited Woodworking Skills?
Absolutely! There are plenty of workbench plans available that are designed for beginners. These often use simple construction techniques and standard lumber sizes to minimize the need for complex cuts and joinery. With some basic tools and a willingness to learn, you can build a sturdy, functional workbench.
How Can I Make My Workbench More Mobile?
To make your workbench mobile, consider adding lockable casters to the legs. This way, you can easily move your workbench around the garage or even take it outside when you need more space or ventilation for a project. Just make sure the casters are rated for the weight of the workbench plus any tools and materials you’ll be using.
What Are Some Must-Have Organizational Accessories for My Workbench?
Some essential organizational accessories for your workbench include a pegboard for hanging tools, a magnetic strip for holding metal tools, drawer organizers for small items, and bins or racks for material storage. These accessories help keep everything you need within reach and your workspace clutter-free.
How do you keep a workbench safe and clutter-free?
It all starts with good habits. Return tools to their designated spots after use, clean up spills immediately, and clear away debris from your work area. Regularly inspect your workbench for wear and tear, and repair or replace any damaged parts promptly.
- Always return tools to their designated spots after use.
- Clean up spills and debris immediately to prevent accidents.
- Regularly inspect your workbench for any signs of damage.
- Repair or replace damaged parts of your workbench promptly.
- Keep the work area well-lit and free from obstructions.
In conclusion, a well-designed garage corner workbench can make all the difference in your DIY projects. By optimizing your space, choosing the right materials, and incorporating smart storage solutions, you can create a workspace that is not only efficient but also a pleasure to work in. Remember to prioritize safety, stay organized, and always be ready to adapt your space to fit your evolving needs. Now, roll up your sleeves and start building the workbench that will bring your creative visions to life!
*We may earn a commission for purchases made using our links. Please see our Disclosure to learn more.